 Pin It
 My nephew pressed his nose against the kitchen window during the first snow, watching the flakes pile up, and I knew exactly what we needed to make together. Oreo snowman cake pops feel like edible magic to a five-year-old, and honestly, they're just as fun to build as an adult. There's something about crushing Oreos into dark crumbles and mixing them with cream cheese that brings back that feeling of creating something from scratch. When you shape them into little snowmen and dip them in white chocolate, they transform into something almost too cute to eat. Almost.
I brought a batch to a holiday potluck last year, and watching people's faces light up when they realized they were holding an Oreo snowman was worth every minute of assembly. One woman took a bite and said it tasted like childhood, then immediately asked for the recipe. That's when I realized these aren't just decorative—they're genuinely delicious, with that perfect balance of cookies, cream cheese, and white chocolate coating.
Ingredients
- Oreo cookies (36 cookies, about 1 standard package): The foundation of everything; crushing them fine ensures a smooth, cohesive dough that holds together beautifully.
- Cream cheese (180 g or 6 oz, softened): This is your binder and the secret to creamy centers—cold cream cheese will break apart instead of mixing smoothly.
- White chocolate or candy melts (350 g or 12 oz): Candy melts melt more reliably than chocolate and set faster, but use real white chocolate if you prefer a richer taste.
- Mini chocolate chips or black decorating gel: These create the eyes and buttons; gel is more forgiving for decorating while wet.
- Orange sprinkle or colored icing: A tiny pinch becomes the carrot nose and brings personality to each snowman.
- Pretzel sticks or colored fondant: Pretzels add a fun salty contrast, while fondant lets you create scarves and hats.
- Lollipop sticks: These anchor everything and make them easy to hold and display.
Tired of Takeout? 🥡
Get 10 meals you can make faster than delivery arrives. Seriously.
One email. No spam. Unsubscribe anytime.
Instructions
- Crush the Oreos into fine crumbles:
- A food processor makes quick work of this, turning cookies into dark sand in seconds. If you don't have one, seal them in a zip-top bag and let frustration out with a rolling pin—it's honestly therapeutic and works just as well.
- Blend with softened cream cheese:
- Mix until the dough is uniform and holds together when squeezed; you'll know it's ready when there are no dry cookie crumbs remaining. This is where the magic starts.
- Shape into two sizes of balls:
- Roll 32 small balls (about the size of a large marble) and 16 bigger ones (a bit larger); think of it as creating a snowman's base and head. Chill your hands between rolling if the dough gets warm and sticky.
- Stack and secure with sticks:
- Press one small ball on top of each large ball gently but firmly, then push a lollipop stick through the center of both to anchor them together. Place them on parchment paper, spacing them a couple inches apart.
- Freeze until completely firm:
- Twenty to thirty minutes in the freezer is crucial; this prevents them from falling apart when dipped in warm chocolate. You'll feel the difference the moment you pull them out—they'll be solid and ready.
- Melt white chocolate smoothly:
- Microwave in short thirty-second bursts, stirring between each, to avoid overheating and burning. If you're using candy melts, they'll melt even easier and more forgivingly.
- Dip with confidence:
- Lower each frozen snowman into the melted chocolate, gently rotate to coat all sides, then lift and let excess drip off before standing it upright in a styrofoam block or cup. The frozen interior keeps them from collapsing into the warm chocolate.
- Decorate while the coating is still wet:
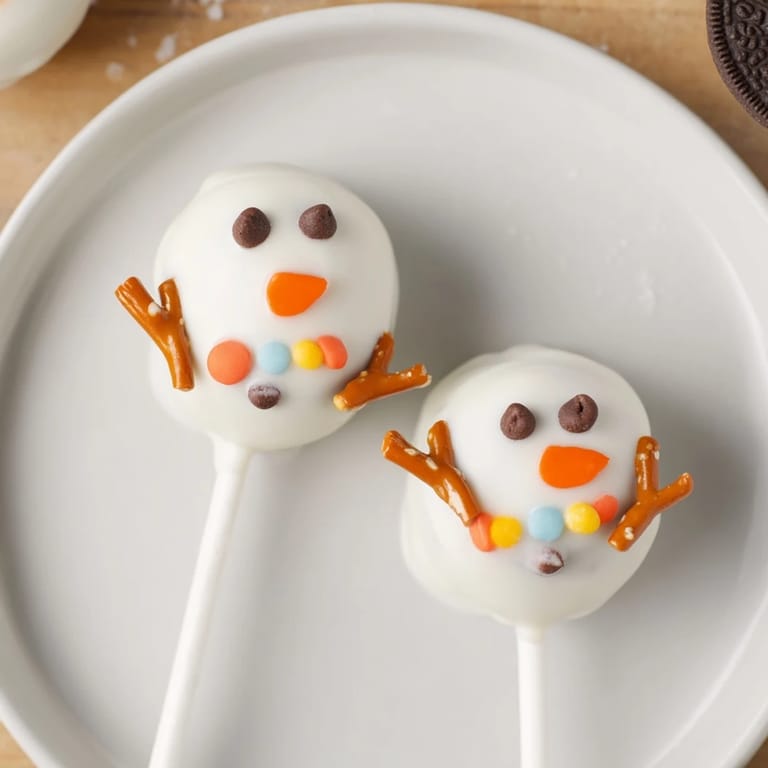
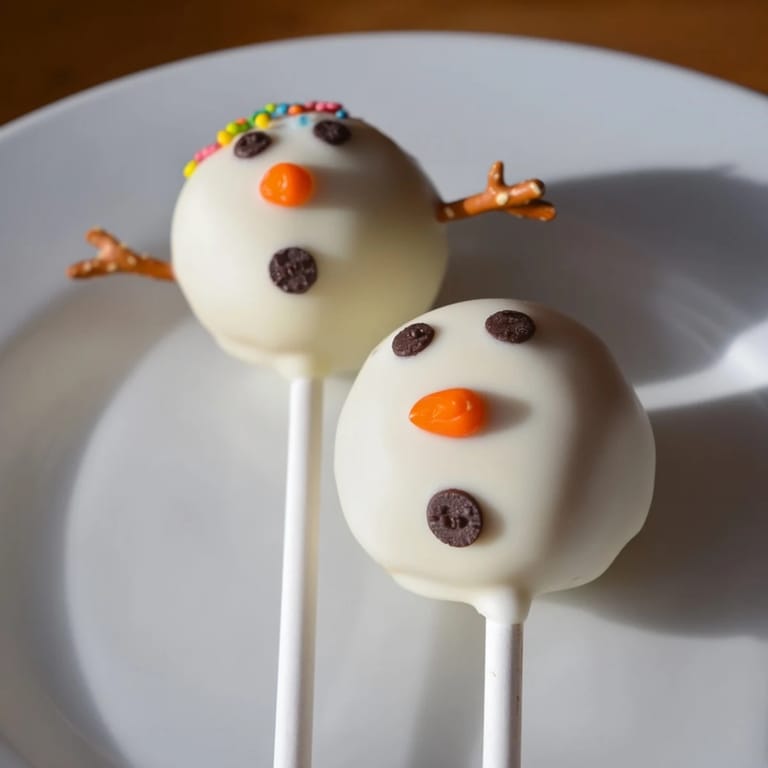
- Press on chocolate chips or dots of gel for eyes and buttons while the white coating is tacky; this makes them stick naturally. The moment is brief but important.
- Add final touches once set:
- Once the white chocolate hardens, poke in pretzel sticks for arms or arrange fondant strips as scarves, creating each snowman's unique personality.
 Pin It
 There's a moment when you pull the first decorated snowman from the styrofoam block, turn it around in your hands, and realize you actually made something beautiful and delicious at the same time. That's the moment these stop being a recipe and start being a memory you'll make again.
Assembly Line Magic
Once you understand the basic structure, making a batch becomes almost meditative—crushing, rolling, stacking, decorating in rhythm. Set up your workspace with all your decorations within arm's reach before you start dipping; that way you can move quickly and keep everything fresh. The efficiency of assembly-line baking actually makes this feel less like work and more like creating art.
Making Them Ahead
These are lifesavers for holiday planning because you can make them days in advance without any quality loss. Store them in an airtight container in the refrigerator for up to five days, and they'll stay creamy inside and crispy outside. Bring them to room temperature for about ten minutes before serving if you want that perfect bite of soft cream cheese center.
Creative Variations
Once you nail the basic snowman, these cake pops become a playground for personalization. Use colored fondant to create different scarves and hats for each snowman, or tint white chocolate in pastels for spring versions that look like little eggs. You can even swap the orange sprinkle nose for a tiny red heart or dot for different seasonal themes.
- Tint fondant with gel food coloring by working a tiny drop in gradually until you reach the color you want.
- If a pop breaks during dipping, immediately roll the bottom in mini chocolate chips to hide the crack and call it intentional texture.
- A styrofoam block from the craft store makes decorating so much easier than balancing them in a cup.
 Pin It
 There's real joy in making something so whimsical and delicious, especially when you can share it with someone who gets the same happiness from it as you do. These little snowmen are proof that the best recipes are the ones that bring people together.
Questions & Answers
- → How do I crush Oreos without a food processor?
Place the Oreo cookies in a zip-top bag and crush them using a rolling pin until finely ground.
- → What is the best way to make the snowmen stick together?
Roll the dough into smaller and larger balls, then gently press one small ball atop a larger one before inserting the stick to keep them stable.
- → Can I use a substitute for white chocolate?
Yes, candy melts work well as an alternative for coating and can provide a smooth finish.
- → How long should the cake pops chill before coating?
Freeze the assembled snowmen for 20 to 30 minutes until firm to ensure the coating adheres properly.
- → How can I decorate the snowmen details?
Use mini chocolate chips or black decorating gel for eyes and buttons, orange icing or sprinkles for noses, and pretzel sticks or colored fondant for arms and scarves.