 Pin It
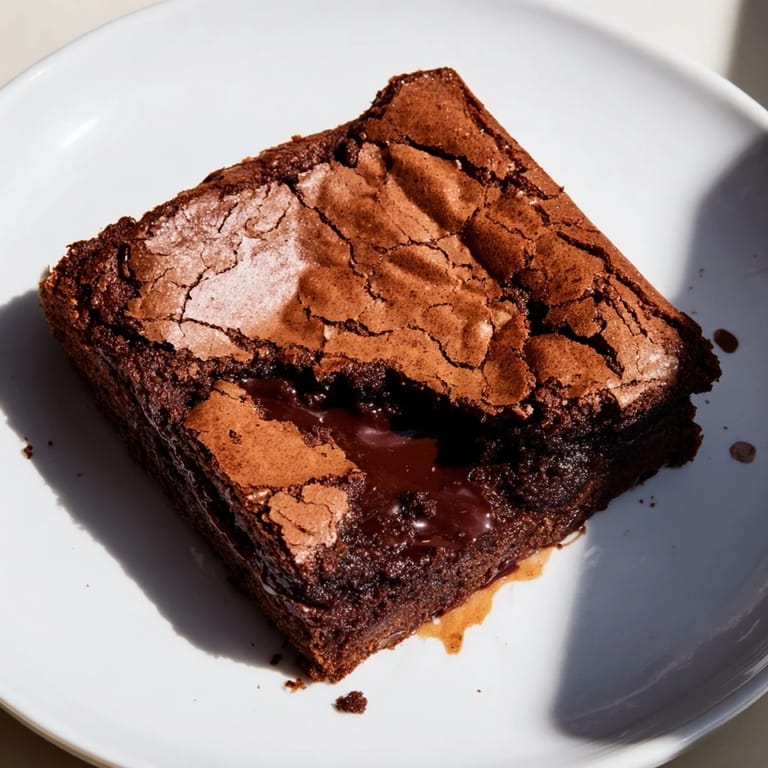
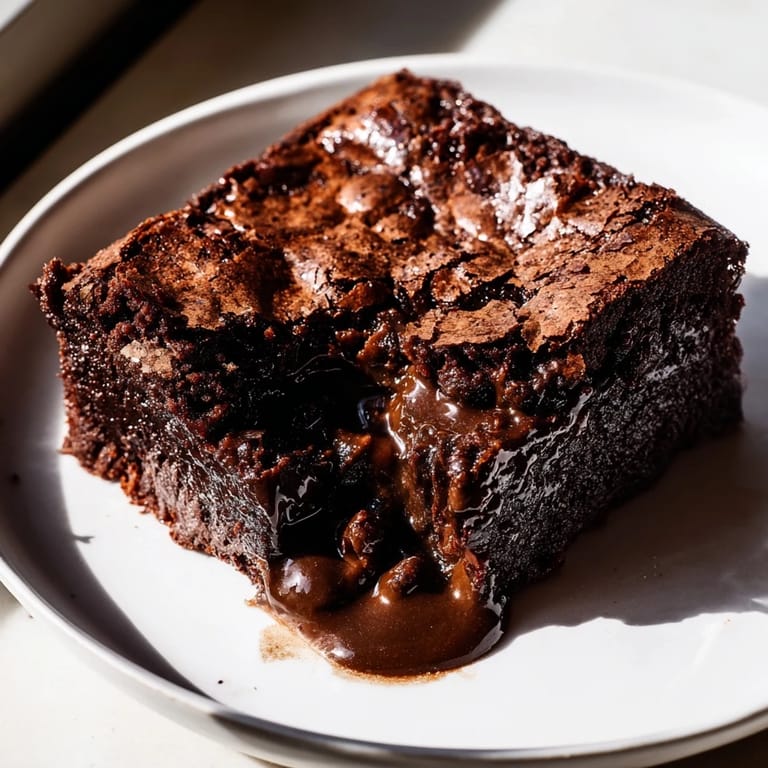
 There's a particular magic that happens when you pull a brownie pudding from the oven and watch it settle into itself—that moment when you know something molten and impossibly rich is waiting underneath a crackly surface. I discovered this dessert during a winter evening when I wanted something that felt more special than a regular brownie, something with a surprise built into every spoonful. The combination of that crispy top giving way to warm, fudgy pudding became the dessert I found myself returning to again and again, especially when I needed to impress people who thought they'd already tasted every chocolate dessert worth making.
I served this to my neighbor who mentioned offhandedly that chocolate desserts were becoming boring, and watching her face change after one bite felt like a small victory in my kitchen. She came back asking for the recipe the next week, and I realized then that this wasn't just another brownie—it was the kind of dessert that makes people lean back in their chair and close their eyes for a moment.
Ingredients
- Unsalted butter (225 g / 8 oz): Use the good stuff here—it's the foundation of the chocolate mixture and deserves quality, as it creates that silky base for everything that follows.
- Semisweet chocolate, chopped (170 g / 6 oz): Chopping it yourself rather than using chips helps it melt more evenly and gives you better control over the final flavor.
- Large eggs, room temperature (4): Cold eggs won't incorporate properly into the batter, so pull them out of the fridge while you're melting the chocolate.
- Granulated sugar (2 cups / 400 g): The beating time here is crucial—this is what creates that signature ribbon texture and ultimately the structure that holds everything together.
- All-purpose flour (1/2 cup / 65 g): A small amount is key; too much flour and you lose the pudding center and get a regular brownie instead.
- Unsweetened cocoa powder (2 tbsp): Sift this carefully to remove lumps, or you'll taste little pockets of powder in the final dessert.
- Vanilla extract (2 tsp): Add this after the mixer slows down—high speed tends to cook off delicate vanilla flavors.
- Kosher salt (1/4 tsp): A small pinch that amplifies the chocolate without making anything taste salty.
- Vanilla ice cream or whipped cream (for serving): Optional but essential—the cold creaminess against the warm pudding is where the real magic lives.
Tired of Takeout? 🥡
Get 10 meals you can make faster than delivery arrives. Seriously.
One email. No spam. Unsubscribe anytime.
Instructions
- Set up and preheat:
- Get your oven warming to 325°F (163°C) while you butter that baking dish thoroughly, making sure to coat the corners where brownie edges like to stick. Having everything ready means you won't scramble once you start beating eggs.
- Melt chocolate gently:
- Set a heatproof bowl over simmering water—the bowl shouldn't touch the water itself—and let the butter and chopped chocolate warm until they're smooth and silky. Let it cool slightly before moving forward, as hot chocolate can scramble the eggs you're about to add.
- Beat eggs and sugar into ribbons:
- This is the moment where your mixer earns its place on the counter; beat those eggs and sugar on medium-high for 5 to 10 minutes until the mixture turns thick, pale, and when you lift the paddle, it falls back into glossy ribbons. You'll actually see the transformation happen.
- Combine chocolate and eggs:
- Reduce the mixer to low speed, add vanilla and salt, then pour in that cooled chocolate mixture slowly while the mixer runs, just until everything comes together. Don't overbeat—this isn't the moment to develop gluten or incorporate unnecessary air.
- Fold in flour and cocoa:
- Sift the flour and cocoa together, then use a spatula to gently fold them into the batter with care and restraint, mixing only until no flour streaks remain. Overmixing here is the main way people accidentally turn this into a regular dense brownie.
- Prepare the water bath:
- Pour your batter into the buttered dish, then nestle that dish into a larger roasting pan and pour hot tap water around it until it comes halfway up the sides. This gentle, humid heat is what creates the pudding center instead of a fully set cake.
- Bake until just set:
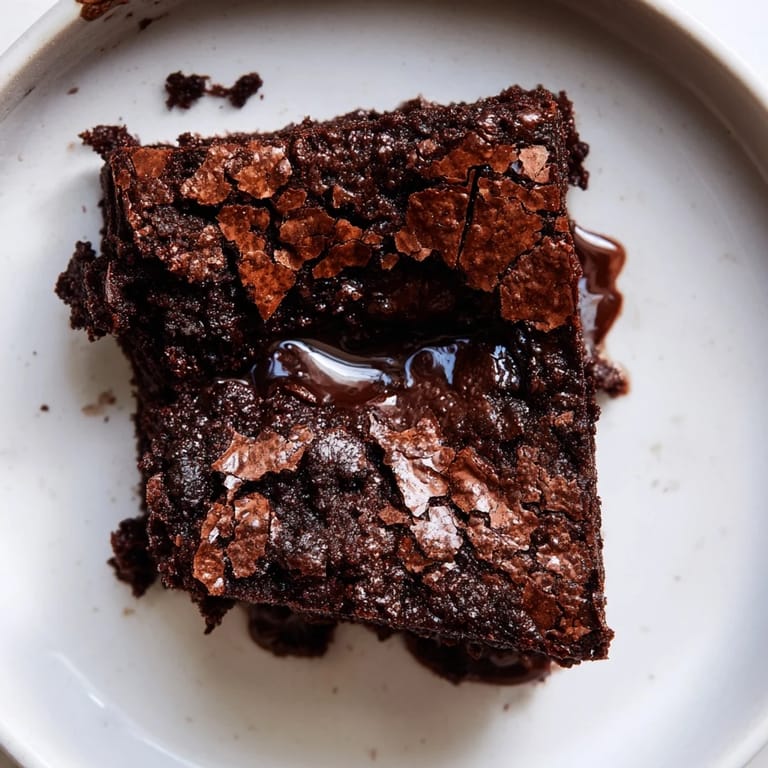
- Bake for a full hour, watching until the top develops that distinctive crackle and looks set, but the center still jigles slightly when you gently shake the pan—that jiggle is your pudding. Trust that gentle wobble; it means you've nailed it.
- Rest and serve:
- Remove from the water bath and let it cool for at least 15 minutes so the pudding can set slightly and become less molten, though still warm. Serve with vanilla ice cream or whipped cream, which melts into the warmth and creates something transcendent.
 Pin It
 I remember one evening when a friend took a spoonful, hit that warm pudding center with their spoon, and let out a small satisfied sound that made everyone at the table lean forward at once. That's when I understood that some desserts aren't just food—they're small moments of genuine luxury that make people forget to be polite and proper.
The Art of the Water Bath
Water baths intimidate people, but they're really just borrowed wisdom from custard making—the water insulates the dish and keeps temperatures gentle and even. The first time I skipped it because I was impatient, I ended up with a fully cooked brownie and no pudding center, and learned immediately why Ina calls for this step. Now I see it as the secret ingredient that separates this from every other chocolate cake you've ever made.
Chocolate Selection and Depth
Semisweet chocolate works beautifully because it has enough sweetness to feel indulgent while retaining enough cocoa flavor to taste grown-up and complex. If you want to push the chocolate intensity, bittersweet chocolate creates a deeper, more sophisticated flavor, though you might want to add a tiny pinch of espresso powder to amplify the cocoa notes without making anything taste like coffee. I've played with this enough times to know that the chocolate you choose genuinely matters—it's not the kind of recipe where you can hide mediocre ingredients.
Timing, Temperature, and Texture
The 15-minute rest after baking is the part I used to skip, convinced I could serve it immediately and it would be fine, until I learned that the pudding actually needs that time to set slightly and become less aggressively liquid. The warm serving temperature is absolutely crucial—cold pudding brownie is completely different and loses all of its magic, so either eat it fresh from the cooling period or gently warm it before serving. One final helpful thought: if you're making this for a crowd and need to time it perfectly, you can actually bake it earlier in the day and gently reheat it in a low oven for a few minutes before serving.
- The water bath temperature should be hot but not boiling—boiling water creates steam pockets that can affect the texture.
- If your baking dish is shallow, check for doneness around 50 minutes rather than the full hour, as thinner batters cook faster.
- A toothpick inserted into the center should come out with wet, fudgy batter clinging to it, never clean and never liquidy.
 Pin It
 This dessert has a way of becoming the thing people ask you to make again and again, the moment you serve it once. There's something about that combination of elegance, indulgence, and genuine ease that makes it feel like a secret worth sharing.
Questions & Answers
- → How is the molten center achieved?
The dessert is baked in a water bath, which gently cooks it to keep the center soft and gooey while the top sets into a crackly crust.
- → Can I use different types of chocolate?
Semisweet chocolate is recommended, but bittersweet can be used for a deeper flavor. Adding espresso powder enhances the chocolate notes.
- → What is the purpose of beating eggs and sugar until ribbon-like?
Beating eggs and sugar thoroughly incorporates air, yielding a lighter texture and helping structure while baking.
- → How should the dessert be served?
It is best served warm, often accompanied by vanilla ice cream or lightly sweetened whipped cream to balance the richness.
- → What equipment is needed for preparation?
A baking dish, roasting pan for the water bath, a mixer to beat eggs and sugar, mixing bowls, spatula, and sifter are essential tools.